
이전 포스트에서 실패한 서로 다른 서버(60번 서버,79번 서버)에 Gitlab CICD를 구축해버렸습니다!
저번에는 반나절을 투자해도 실패했는데, 이번에는 몇 시간 만에 성공했습니다. 이 글에서는 구축 과정과 트러블슈팅 내용을 정리해 보았습니다.
gitlab의 Pipelines는 github의 Actions와 유사한 기능을 제공합니다. 이제 함께 구축해 보겠습니다.
Gitlab CI/CD
먼저 Gitlab CI/CD에 대해 알아보겠습니다.
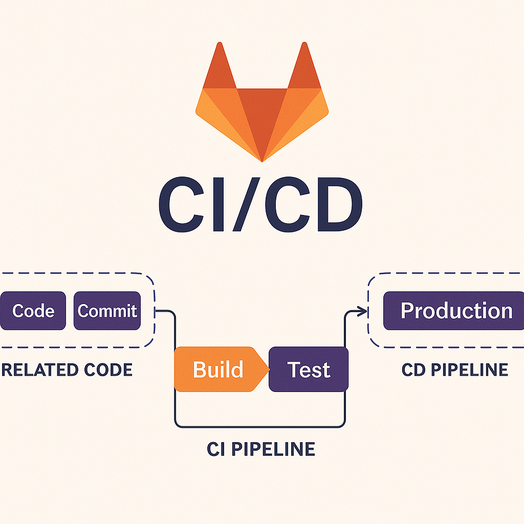
GitLab CI/CD는 GitLab에서 제공하는 연속 통합(Continuous Integration, CI) 및 연속 배포(Continuous Deployment, CD) 도구입니다.
이는 소프트웨어 개발 프로세스를 자동화하고, 코드가 변경될 때마다 빌드, 테스트, 배포 작업을 자동으로 실행하여 개발자의 생산성을 높여주는 시스템입니다.
주요 기능
-
CI (Continuous Integration)
-
코드가 저장소에 푸시될 때마다 자동으로 빌드하고 테스트합니다. 이를 통해 코드의 품질을 지속적으로 유지할 수 있습니다.
-
예: 새로운 커밋이 저장소에 푸시되면 자동으로 빌드 및 테스트가 실행되어 오류를 빠르게 발견할 수 있습니다.
-
-
CD (Continuous Deployment)
-
CI 과정 후, 코드가 정상적으로 빌드되고 테스트를 통과하면 자동으로 배포됩니다.
-
예: 웹 애플리케이션이 자동으로 배포되어 사용자에게 실시간으로 업데이트를 제공할 수 있습니다.
-
작동 원리
GitLab CI/CD는 .gitlab-ci.yml 설정 파일을 통해 작동합니다. 이 파일은 프로젝트의 루트 디렉토리에 위치하며, 각 작업(Job)과 파이프라인(Pipeline)을 정의합니다.
파이프라인은 여러 단계(Stage)로 나뉘어 있고, 각 단계는 여러 작업(Job)을 포함할 수 있습니다. 예를 들어, 코드 빌드, 단위 테스트, 배포 등의 작업이 단계별로 실행됩니다.
구축 목표
저는 60번 서버에 Gitlab 레포지토리를 두고, Pipeline을 설정해 79번 서버의 Verdaccio에 패키지를 업데이트(배포)하는 CI/CD 시스템을 구축했습니다.

시작 해 봅시다!
1. 다른 두 서버 연결
먼저, 60번 서버와 79번 서버가 서로 통신할 수 있어야 합니다.
두 서버 모두 WAS 서버로, SSH로 접속 가능하도록 설정되어 있습니다. 60번 서버에는 Docker가 설치되어 있지 않고, 79번 서버에는 Docker가 설치되어 있습니다.
회사 정책상 60번 서버에 Docker를 설치할 수 없어서, 79번 서버에 Docker로 Verdaccio를 설치하고 60번 서버에는 Gitlab을 설치했습니다. 60번 서버의 Gitlab Pipeline이 79번 서버의 Verdaccio에 패키지를 빌드하고 배포해야 하므로 두 서버 간 연결이 필요합니다.
이 작업을 진행해도 되는지 사내 서버 관리자에게 문의했고, 다음과 같은 답변을 받았습니다:
SSH는 보안성이 높은 프로토콜이며, 외부에 데이터를 노출하지 않고 내부 네트워크로 보호된 환경이기 때문에 서로 다른 서버를 연결하는 것은 안전합니다.
1) SSH 키 생성
자동화된 작업에서 비밀번호 입력 없이 다른 서버에 접속하기 위해 SSH 키 인증을 설정합니다. 60번 서버에서 다음 명령어를 실행합니다:
sudo -u gitlab-runner ssh-keygen -t rsa -b 4096 -C "gitlab-runner@yourdomain.com"이 명령어는 gitlab-runner 사용자를 위한 SSH 키 쌍(id_rsa와 id_rsa.pub)을 생성합니다. 기본적으로 /home/gitlab-runner/.ssh/ 경로에 저장됩니다.
2) 공개키를 79번 서버에 추가
60번 서버에서 생성한 공개키를 79번 서버에 추가합니다:
sudo -u gitlab-runner ssh-copy-id -i /home/gitlab-runner/.ssh/id_rsa.pub koast@10.2.10.79이 명령어는 gitlab-runner 사용자의 공개키를 79번 서버의 사용자 계정의 ~/.ssh/authorized_keys 파일에 추가합니다.
설정이 완료되었는지 확인하려면 다음 명령어를 실행합니다:
sudo -u gitlab-runner ssh koast@10.2.10.79비밀번호 입력 없이 79번 서버에 접속되면 성공적으로 설정된 것입니다. 이제 60번 서버의 CI/CD 파이프라인이 79번 서버에서 명령을 실행할 수 있습니다.
2. Gitlab Runner 설정
이제 Gitlab Pipeline을 구축하기 위해 runner를 등록해야 합니다. 먼저 Gitlab에서 토큰을 발급받고, 이 토큰을 사용하여 서버에 runner를 등록합니다.
1) Runner Token 발급받기
Gitlab에서 새로운 runner를 생성하고 토큰을 발급받습니다:
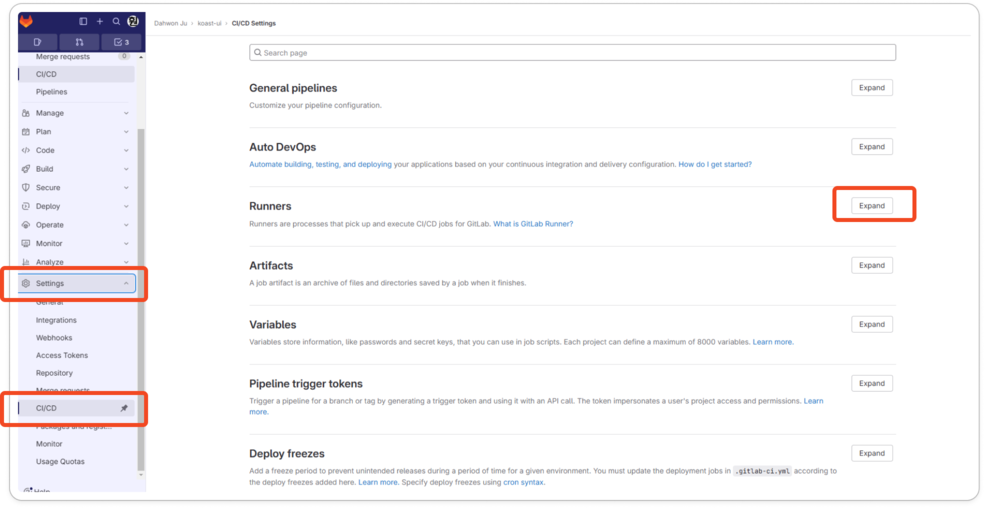 [Settings] - [CI / CD] - [Runners]로 이동한 후 [Expend]를 클릭합니다.
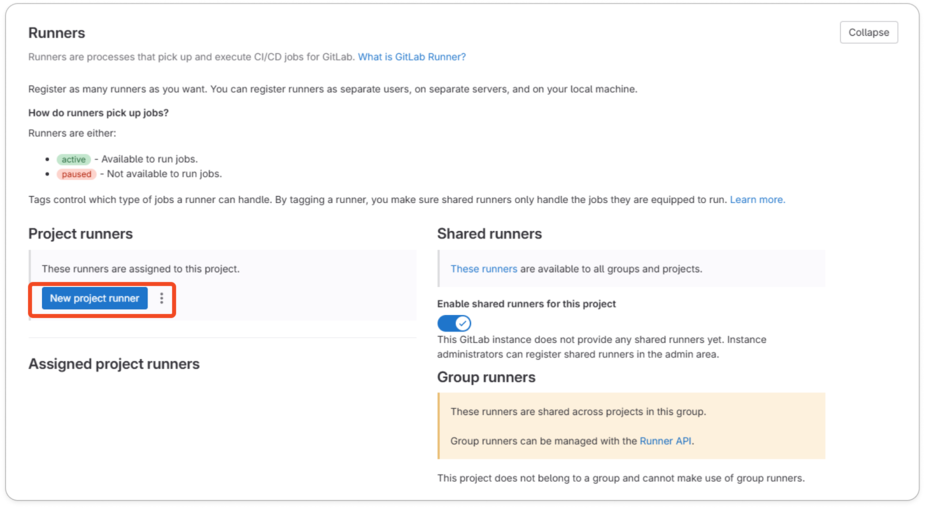 [New Project Runner]를 클릭하여 새 프로젝트 러너를 생성합니다.
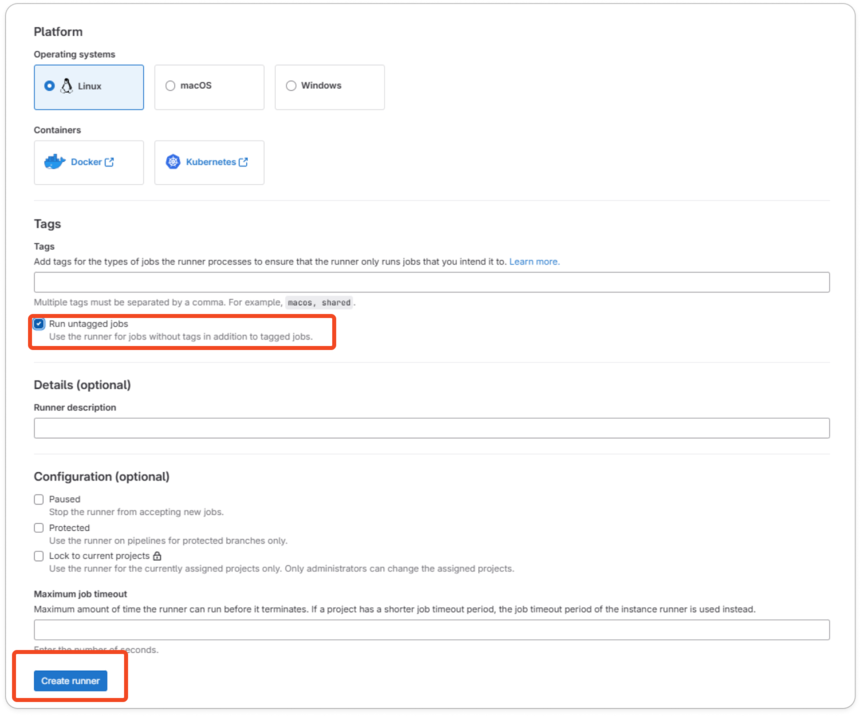 적절한
적절한 OS를 선택하고, Run unstaged jobs 옵션을 체크하여 스테이지되지 않은 작업도 실행할 수 있도록 합니다. [Create Runner]를 클릭합니다.
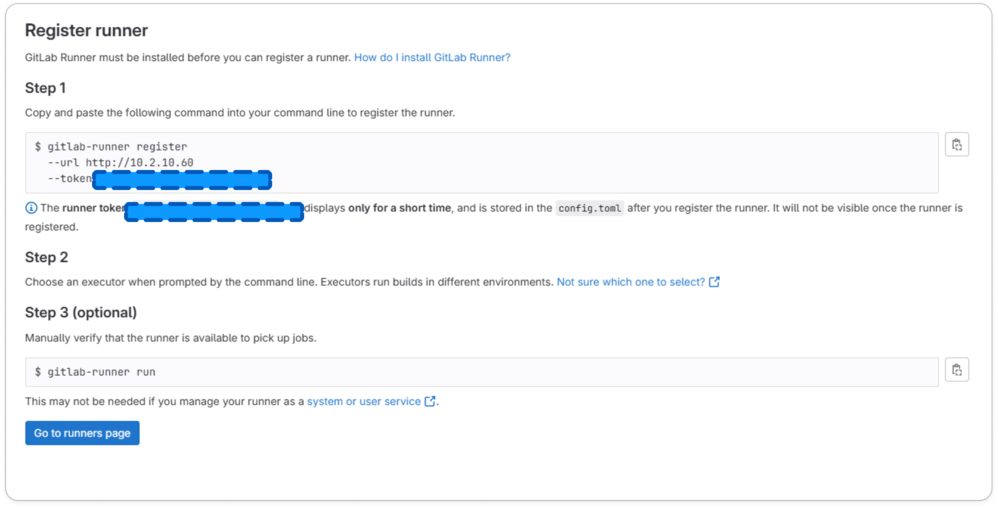 생성된
생성된 Token을 복사합니다.
이렇게 하면, Gitlab의 Runner를 등록할 준비가 다 됐습니다.
2) 60번 서버에서 Runner 추가
Gitlab이 세팅되어 있는 60번 서버에서 다음 명령어를 입력합니다.
sudo gitlab-runner register아래와 같이 필요한 정보를 입력합니다(중요 부분은 강조 표시했습니다):
Runtime platform                                    arch=amd64 os=linux pid=404898 revision=3153ccc6 version=17.7.0
Running in system-mode.

There might be a problem with your config based on jsonschema annotations in common/config.go (experimental feature):
jsonschema: '/runners/0/token' does not validate with https://gitlab.com/gitlab-org/gitlab-runner/common/config#/$ref/properties/runners/items/$ref/properties/token/minLength: length must be >= 1, but got 0

Enter the GitLab instance URL (for example, https://gitlab.com/):
#gitlab 주소 입력
http://10.2.10.60/
Enter the registration token:
#복사한 token 붙여넣기
glrt-3GVh5...
Verifying runner... is valid                        runner=3GVh54XXK
Enter a name for the runner. This is stored only in the local config.toml file:
#runner 이름 입력(저는 verdaccio-runner로 입력)
[beer]: verdaccio-runner
Enter an executor: docker+machine, kubernetes, instance, custom, ssh, parallels, docker, docker-windows, shell, virtualbox, docker-autoscaler:
#ssh 실행 방식 입력(저는 WAS서버이기 때문에 ssh로 입력)
ssh
Enter the SSH server address (for example, my.server.com):
#ssh 서버 주소 입력
10.2.10.79
Enter the SSH server port (for example, 22):
#ssh 포트 입력
22
Enter the SSH user (for example, root):
#ssh id 입력
id
Enter the SSH password (for example, docker.io):
#ssh password 입력
password
Enter the path to the SSH identity file (for example, /home/user/.ssh/id_rsa):
#ssh 키 경로 입력
/home/gitlab-runner/.ssh/id_rsa
Runner registered successfully. Feel free to start it, but if it's running already the config should be automatically reloaded!
이제 60번 서버에서 79번 서버로 연결되는 Runner가 생성되었습니다. (꽤나 복잡스럽지만, 한 번 해놓으면 쭉 사용할 수 있습니다.)
설정이 제대로 되었는지 확인하려면 Runner 설정 파일을 확인합니다:
sudo nano /etc/gitlab-runner/config.toml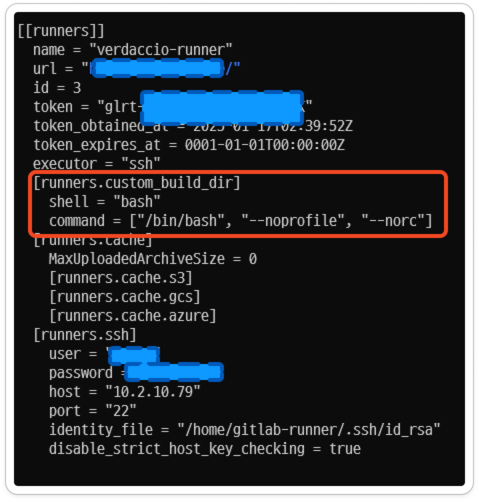
내가 의도한 대로 설정됐는지, 빠진 부분은 없는지 확인해봅시다. URL은 60번 서버 주소여야 합니다. 빨간 박스로 표시된 부분은 필수값이 아닙니다.
등록된 Runner 목록을 확인하려면:
sudo gitlab-runner listListing configured runners ConfigFile=/etc/gitlab-runner/config.toml
Executor=docker Token= URL=
verdaccio-runner Executor=ssh Token=glrt-3~ URL=http://10.2.10.60/잘 나오는군요.
3. CI/CD 파이프라인 설정
이제 CI/CD 파이프라인을 설정하기 위해 프로젝트 루트에 .gitlab-ci.yml 파일을 생성합니다.
다음은 Node.js 프로젝트를 빌드하고 Verdaccio에 패키지를 게시하는 파이프라인 설정 예시입니다:
stages:
  - install
  - build
  - publish

variables:
  NODE_VERSION: "20.9.0"
  NPM_REGISTRY: "http://10.2.10.79:4873"

default:
  image: node:${NODE_VERSION} # 모든 job에 대한 기본 이미지 설정

cache:
  paths:
    - node_modules/ # node_modules 캐싱

before_script:
  - echo "//10.2.10.79:4873/:_authToken=$NPM_TOKEN" > ~/.npmrc # NPM 인증 정보 설정

install:
  stage: install
  script:
    - npm install # 모든 의존성 설치

build:
  stage: build
  script:
    - npm run build # 빌드 실행

publish:
  stage: publish
  script:
    - |
      git config --global user.name "gitlab-ci"
      git config --global user.email "gitlab-ci@gitlab.com"
      git config --global pull.rebase false
      git checkout main
      git pull origin main --no-rebase
      npm publish --registry $NPM_REGISTRY
  rules:
    - if: $CI_PIPELINE_SOURCE == "push" && $CI_COMMIT_BRANCH == "main"
      when: never
    - if: $CI_PIPELINE_SOURCE == "merge_request_event" && $CI_MERGE_REQUEST_TARGET_BRANCH_NAME == "main" # Merge Request 이벤트 발생 시에만 Publish
      when: always
18번 라인의 NPM_TOKEN은 Verdaccio에 인증하기 위한 환경 변수입니다. 이 토큰은 Verdaccio에 로그인할 때 자동으로 발급됩니다:
npm login --registry http://10.2.10.79:4873//10.2.10.79:4873/:_authToken="eyJhbGciOi..."_authToken 값을 복사하여 GitLab의 CI/CD 변수로 등록합니다:
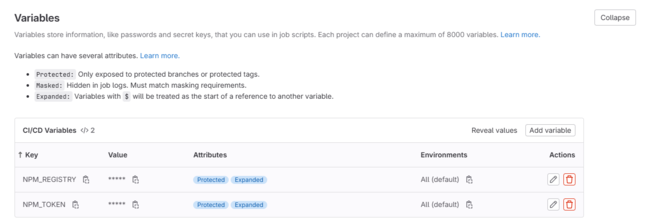
[Settings] - [CI/CD] - [Variables]에서 NPM_TOKEN 변수를 추가합니다.
이제 모든 설정이 완료되었습니다. 60번 서버에서 Merge Request를 통해 79번 서버의 Verdaccio에 패키지가 자동으로 업데이트됩니다.
트러블슈팅
 보통... 이 정도는 해보죠..?
1) Cannot connect to the Docker daemon
Runner가 Docker executor로 설정된 경우 다음과 같은 오류가 발생할 수 있습니다:
Running with gitlab-runner 17.7.0 (3153ccc6)
  on verdaccio-runner buyoxckae, system ID: s_762783a2299e
Preparing the "docker" executor
00:09
ERROR: Failed to remove network for build
ERROR: Preparation failed: Cannot connect to the Docker daemon at unix:///var/run/docker.sock. Is the docker daemon running? (docker.go:1016:0s)
Will be retried in 3s ...
ERROR: Failed to remove network for build
ERROR: Preparation failed: Cannot connect to the Docker daemon at unix:///var/run/docker.sock. Is the docker daemon running? (docker.go:1016:0s)
Will be retried in 3s ...
ERROR: Failed to remove network for build
ERROR: Preparation failed: Cannot connect to the Docker daemon at unix:///var/run/docker.sock. Is the docker daemon running? (docker.go:1016:0s)
Will be retried in 3s ...
ERROR: Job failed (system failure): Cannot connect to the Docker daemon at unix:///var/run/docker.sock. Is the docker daemon running? (docker.go:1016:0s)
해결 방법: 60번 서버에 Docker가 설치되어 있지 않기 때문에 발생하는 오류입니다. Runner를 등록할 때 executor를 ssh로 설정하면 해결됩니다.
2) open /home/gitlab-runner/.ssh/id_rsa: no such file or directory
SSH 키가 등록되지 않은 경우 발생하는 오류입니다:
해결 방법: 앞서 설명한 대로 SSH 키를 생성하고 79번 서버에 등록해야 합니다.
3) Process exited with status 1
79번 서버에 Node.js와 npm이 설치되어 있지 않아 발생하는 오류입니다:
 Running with gitlab-runner 17.7.0 (3153ccc6)
  on verdaccio-runner 3GVh54XXK, system ID: s_762783a2299e
Preparing the "ssh" executor
00:01
Using SSH executor...
Preparing environment
00:00
Running on eomserver via beer...
ERROR: Job failed: prepare environment: Process exited with status 1. Check Types of shells supported by GitLab Runner | GitLab Docs  for more information
이 에러가 가장 화났는데요. 무엇 때문에 오류가 났는지 불명확하게 써져 있어서 한참 애먹었습니다.
해결 방법: 79번 서버에 Node.js와 npm을 설치합니다:
curl -fsSL https://deb.nodesource.com/setup_20.x | sudo -E bash -
sudo apt-get install -y nodejs
설치가 완료되었는지 확인:
node -v
npm -v
이제 모든 설정이 완료되었습니다. 이 CI/CD** 파이프라인을 통해 코드 변경 사항이 자동으로 빌드되고 배포되어 개발 프로세스가 더욱 효율적으로 진행할 수 있습니다.**